Monday, 9 July 2012

New Designers

So I am back in Manchester now after showing my work at New Designers 2012!
What a great show it was, I wish that there were more regular shows or it was longer as it was so good to be around that many students and professionals. 

I'm so glad that I took the opportunity to show my work :)
So on that high note, I will post some pictures that I took while there.


 Setting up the show! A nice contrasting red and grey theme (would have been better orange and grey, but there you go :P)! We did a lot of painting that day!
 A shot from above showing the chaos of setting up!
 Another shot from above! You can actually see the base I used on here.
 A lot of work later and the boards are up and the models are taking their places!
 Still a little bit more work.
 Bringing the beach to New Designers, I managed to do this without making too much mess thanks to help from a friend.
 And the model is finally put together! Not looking too bad if I do say so myself :)
 A little bit of work needed to stick the orange wings on to the top.
 The show all up and ready for the opening day! 
 The boards and models on the right hand side,
 and the boards and models on the left.
 An aerial view of the Salford stand with my model just showing itself. 
 The model in all its glory, with bucket and spade added to help set the scene.
 I put some business cards and my retractable bearings on the table so people could take a card and look at some of the more detailed designing.
 A similar view, but showing the sand in the base as well
 My presentation boards, project work and portfolio. I left more of my cards here for people to take.
A nice eye catching red at the entrance to the show.


I am happy with my work, and I am impressed with the feedback that I received about it. 
It was great being around all of the other Universities to see the different approaches they take to their final major projects.


So as always, thank you for reading, and don't hesitate to comment or message me for anything :)


Matt Bowman

Saturday, 30 June 2012

Final Model Making

So as I said in the last post, I needed to finish my final prototype model for yesterday (29th June).
Needless to say it has been a stressful week and Friday was a crazy rush to get things organised and wrapped in bubble wrap to protect them for the drive down. 
The stress was worth it, as the model is now finished! :D


Here are a few of the photos showing some of the processes that I went though in the final stages of model making (I said a few, but it might be quite picture heavy)!


 In the spray booth
 Orange parts sprayed and final touches of filler on the body
 The table part sprayed and nearly finished
 I decided I had to make a base that would hold a parasol, I also made it so I could fill it with sand!
 Dwayne from the apprentice was in the workshop developing some products so thought I would take the opportunity to get a photo
 The body sprayed and sticking on the seal
 The base for the umbrella fully made, just needed spraying
 The base needed to be taped off so that the grey front could be sprayed without covering the white
 The grey part sprayed
 This shows the tape removed, with only a few minor parts to touch up
 I painted the inserts that I had 3D printed and stuck them on to the body
 All the inserts fully stuck
 I used a jig to drill holes into the wings and the top to secure them together
 All secured
 The fully assembled table top
 I then cut out the silicone sheet for the non slip mat
 This is the final model fully arranged and on the pole!
The umbrella up, and all the model fully put together!
I will take a final photograph when the model is up at the show to get the full effect, but overall I am happy with the end result!

And comments would be great, and once again, thanks for reading!

Final Modelling!

As I write this I am on the train on the way down to London to prepare for the New Designers exhibition, which runs from the 4th to the 7th July.

To prepare for this I firstly had to re-work my presentation boards due to a change in the format that they would be showed. In the degree show we had four A3 boards that were split up into Research, Product Features, user Interaction and Materials and Manufacturing, however, for the New DEsigners exhibition, we were required to condense these four boards into one A2 board. 
This could have been done one of two ways, either shrink the A3 boards to A4 and arrange them onto the A2 page, or re-work the four boards and create a new A2 board, highlighting the key points.

I opted for the second option, even though it was more work...
So here is the board, the quality has been reduced for uploading, so if you want to see it in high quality, come and visit my show! :D


As well as re-working the presentation boards, I also had to finish my final prototype for the display! I will post some more pictures of the process in a second post, just to keep it organised! :)

As always, thank you for reading! 

Matt

Monday, 18 June 2012

Ohh by the way...

I found out today that I got a 1st class degree! How exciting! :D


So, I have a 1st Class BA (Hons) in Product Design!


I just need to graduate now :)


Thanks for following! 


Matt Bowman

Degree Show

I thought a little update was in order, as quite a lot has happened recently!
First off, the Uni degree show has come and gone, and it was a great show! As well as a brill practise for New Designers at the start of next month!
Thank you to everyone that managed to come down and check it out :)


So as that has finished I wanted to show you a few pieces of work that I did for the show :)


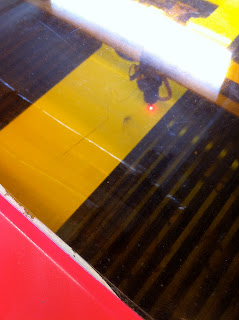
A picture showing the laser cutter in action! The first time is actually used it, but it came out pretty well :)
I used this to make a business card holder, a more memorable business card holder!


 Me bending the plastic to the shape that I needed, incase you hadn't guessed, its a hand...


 ...and here it is! The finished article! :)


Here is the business card holder in action, next to my lovely mug!


My presentation boards, example sketch sheets and my entire body of work for the final major project


This is my A1 board, that I posted previously! I also had my portfolio open for people to look through.


On top of displaying my work in the product design exhibition space, I was also chosen to show some of my sketches on the big screen in the lobby of the building! I was pretty chuffed when I was asked to submit some work for this, one of three people :)
However, I dont think my lecturer used my best sheets...


As usual, thank you for reading, and please don't hesitate to contact me if you want to know anything, and any feedback would be appreciated :)

Matt Bowman

Wednesday, 30 May 2012

Big Poster!

So to compliment my work for the university degree show (that I have kept hidden from you for now), I have done an A1 poster, showing my product in situ. 
I feared this could be difficult, however, I managed to find a way around this.


Now, usually people add in rendered images of products into a photo, but this can often come out looking odd due to the levels and the detailing of the photo compared to the rendered image. 
I couldn't do this as I (unfortunately) couldn't afford to go on holiday to take a photo to use - sad times!
So I managed to find an image on a stock photography website, which I bought...(it pains me to do that, but it was a necessary evil)


To overcome the badly placed rendered image scenario, I decided to create a comic like effect with the image and use Illustrator to create block colours around the different details in the image, a most laborious task I must say! 
Laborious but rewarding I believe! 


Take a look at a sneak peak of the work I will be showing at the degree show! :)


Enjoy!


A little bit of work on the side

Here is a bit of work that I have done recently for a company showing a concept for a kitchen design!


Being a perfectionist I would have liked to have refined it more, but it fulfilled the brief and the clients were happy! :)


The image is only small, but can be found in the photos section of this Facebook page:


http://www.facebook.com/MagnetKitchens


Sunday, 13 May 2012

Workshop Time!

Hello!

This post has been postponed for about a month while I was finishing the work for my final submission on my final project! More important than blogging im sure you will agree.

So, I just thought I would show some of my work that I have been doing in the workshop to create a visual model for my degree show! :)

Enjoy! (Its fairly picture heavy so hopefully it will load ok!)


 A photo of my work on the CNC machine - a machine that I learnt to use during my time in the workshop. This meant I could use it myself instead of asking the technician all the time :) 


After the some of the parts were finished on the CNC machine I had to stick them together and use filler to fill any gaps. These were then sanded down.


 The table part of my model, the photo shows the filler drying and waiting to be sanded back.


The base part of my model had to be created out of layers of MDF, 22mm in this case. These layers were then stuck together to give the desired height.


This photo shows the parts being bridged by filler, as it was very difficult to get them to match by hand!


Me! Ready to get sanding (some more - hence the hood hair!). A very messy job indeed!


This was painful to do as I didn't want to make a mistake! Luckily I had some help from a friend.


And once it had been sanded again, and the gaps filled, I separated the layer that had been double sided so that I could vac form it, giving me the wall thickness, instead of a lump of MDF!


My first Vac Formed part! it went rather well, but that was the easy part, the processing after this was a huge pain, but had to be done.


All of the parts Vac Formed for the base section and taped together, not too bad a job if I do say so myself.


And, the base section stuck together and the gaps filled.


Mosre sanding, most of my time in the workshop was spent sanding! 

Unfortunately, I had run out of time to work on my model for the hand in, so I will be picking up the model making this week coming and will hopefully have some progress to show. 

In the mean time I will post some of my other work to keep you interested!
Thanks for looking!

Matt